Posted on Leave a comment

Brew Guide: Woodneck Coffee

Brew Guide: Woodneck Coffee

Woodneck brewing originated in Japan in the early 1900s. It’s unique flavor comes from the use of a cloth filter and the slow brewing process. We recommend the Woodneck to those who are truly dedicated to the craft of home-brew – it requires patience and precision to get the bold, sweet cup it’s known for.

This brew is intermediate, and takes about 12 minutes.

WHAT YOU NEED

  • Coffee
  • Water
  • Woodneck
  • Cloth Filter
  • Gooseneck Kettle
  • Grinder

AMOUNTS

  • 3 tbsp coffee and 8 oz water
  • 5 tbsp coffee and 13 oz water
  • 24 grams coffee and 236 grams water
  • 40 grams coffee and 385 grams water

GROUNDS

You’ll want to grind your coffee on a medium grind – a #6 for those who have their coffee ground on an industrial machine.

Starting Tips

If you have a new Woodneck cloth filter, make sure you remove the cloth filter from its frame and soak it in boiling water for 5 minutes before beginning to brew.

Water

Heat your water until it’s boiling and then remove it from the heat source. Woodneck brews best with an unusually low temperature of water – around 175 – 185 degrees. Let your water cool for about 1 minute before you begin the brewing process.

FILTER

Place the filter onto the the wire frame, set it over the carafe and pour boiling water through the filter. The main purpose of this step is to warm your vessel prior to brewing to keep your coffee hotter for longer.

ADDING GROUNDS

Once you’ve dumped the water out of your woodneck, place the grounds into your filter. Give it a gentle nudge, so the grounds settle flat.
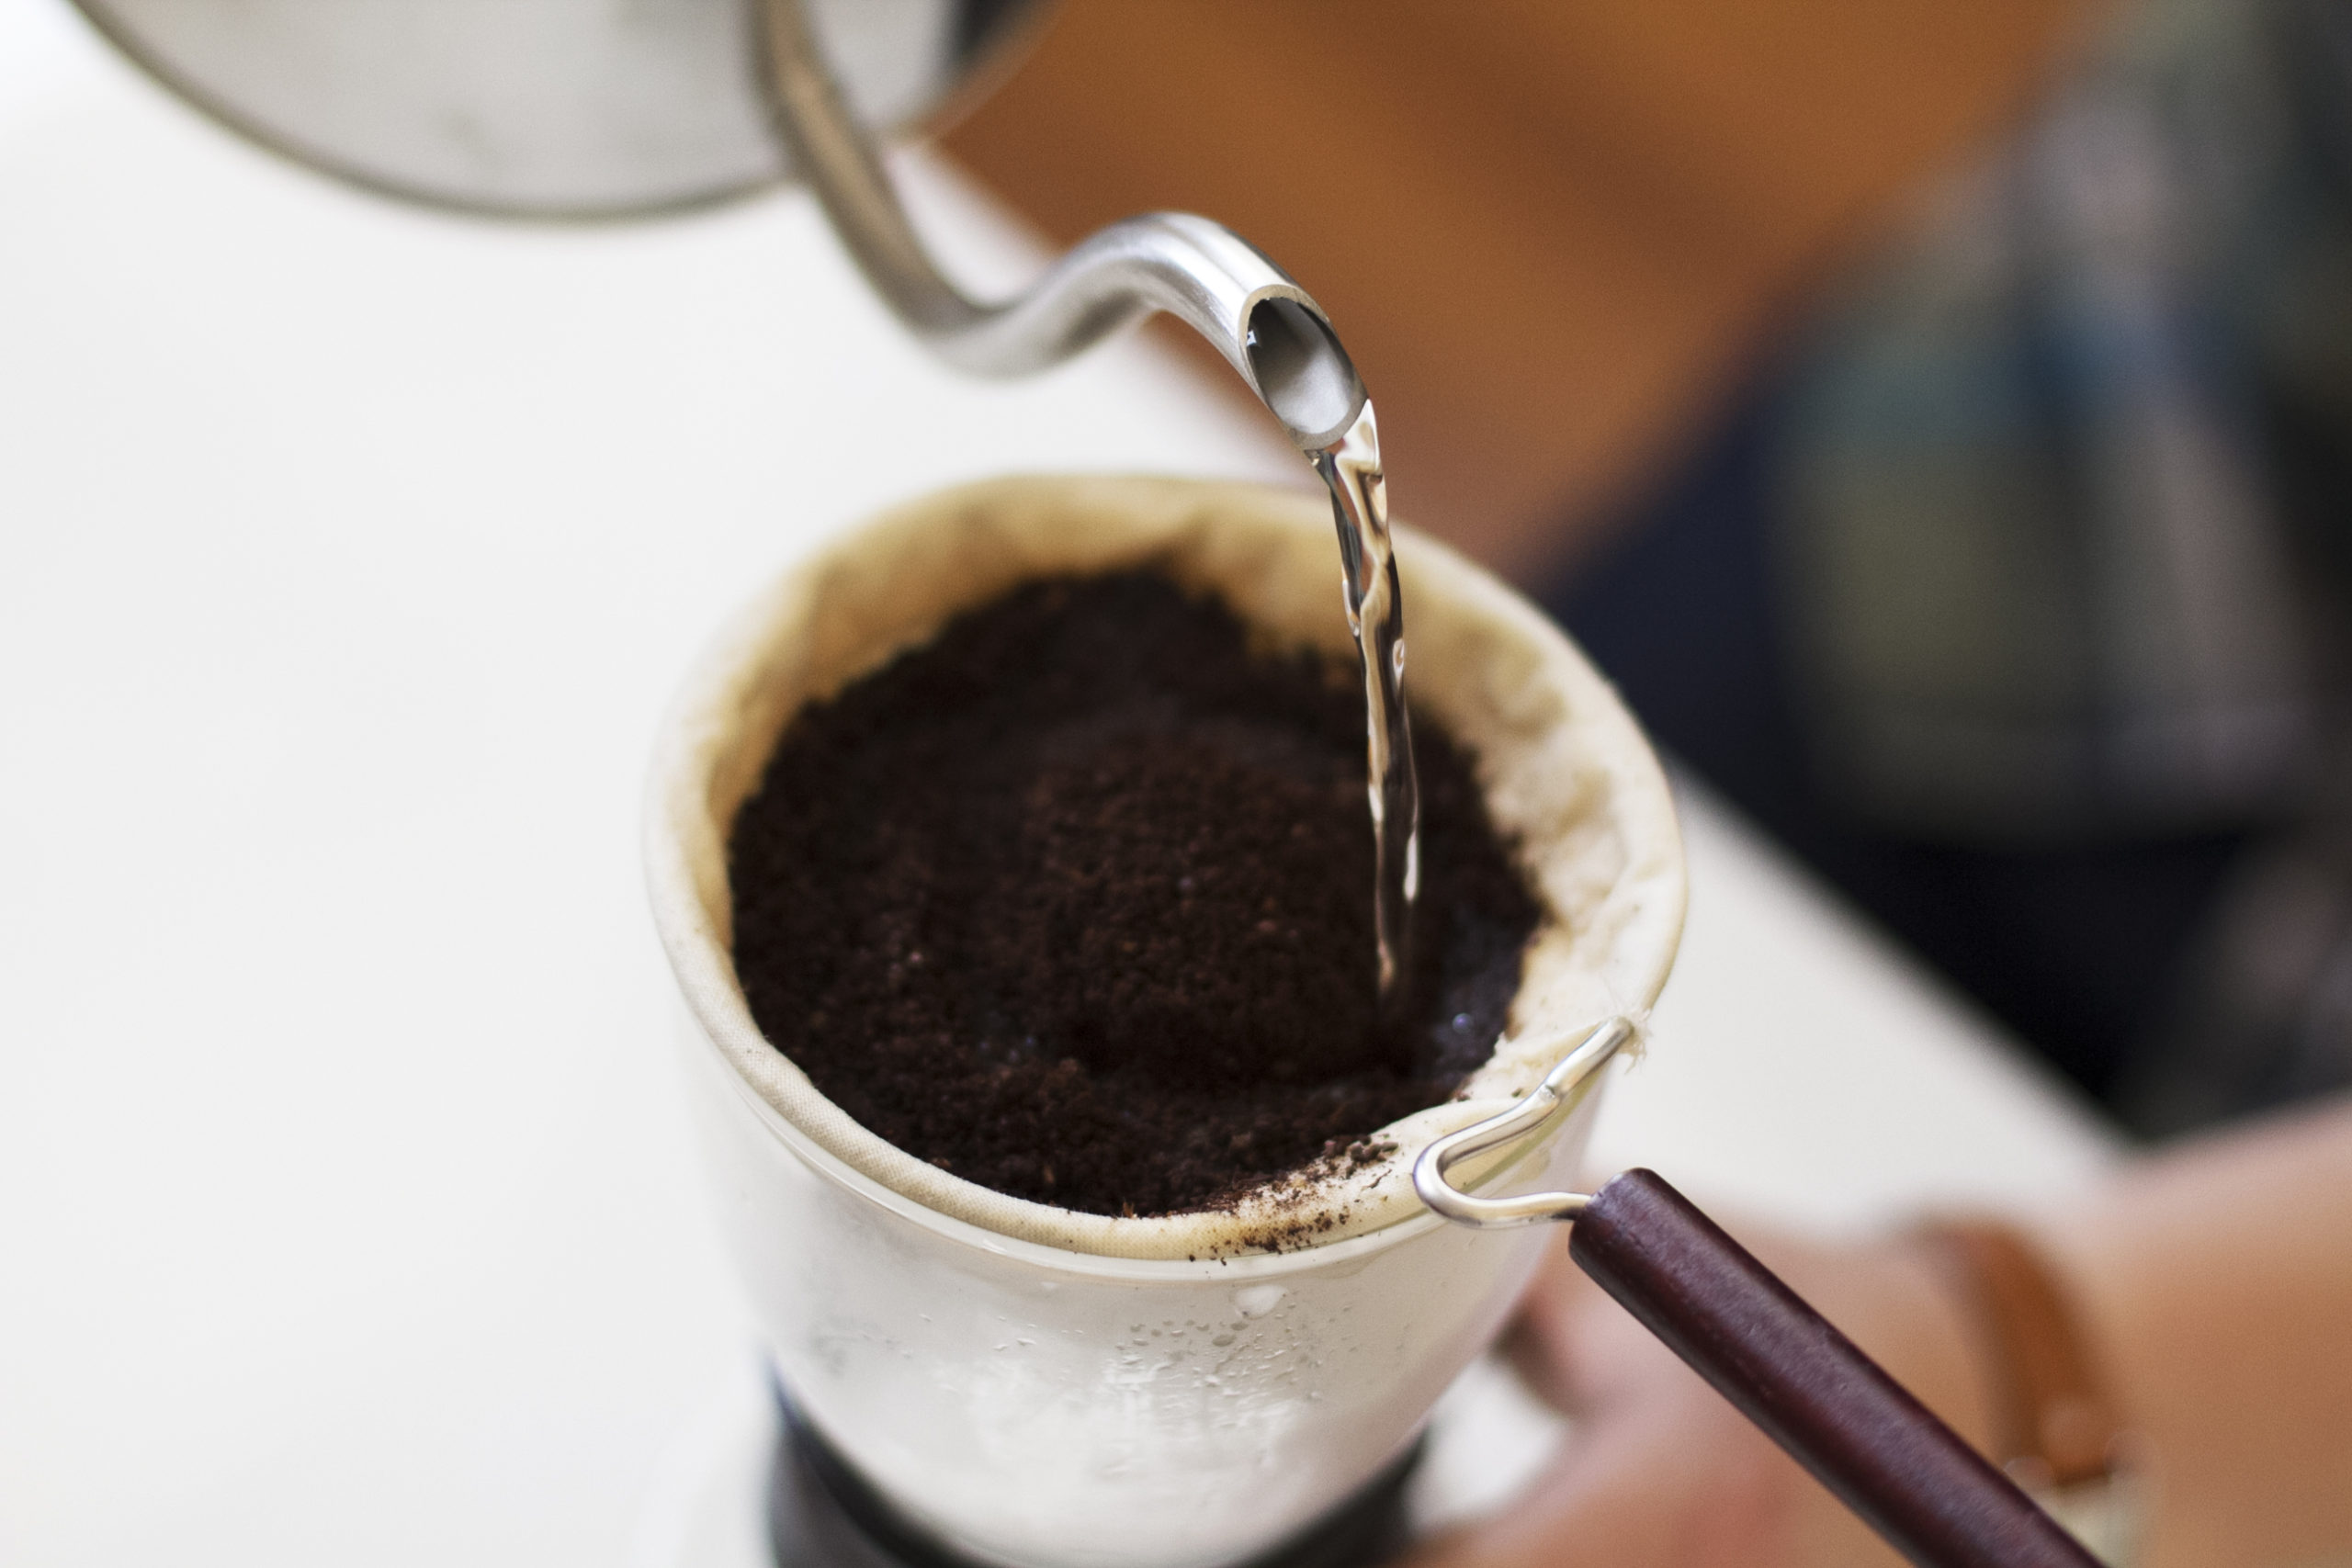
POUR TO BLOOM

Begin pouring water in a very slow, circular pattern, starting at the edges and working your way towards the middle. When the water has barely covered the grounds, stop and let it bloom for 45 seconds.

CONTINUE POURING

To continue the brew, pour half of the remaining water in the same slow circular fashion as before, and then wait for it to fully filter through. Finally, pour the last round of water very slowly until the filter is full and wait for your brew to finish.

FINAL STEPS

Once it has all filtered through, you can set the filter aside. To properly care for your cloth filter, give it a thorough rinse and store it in a small dish of water in your fridge.

ENJOY

Now enjoy your strong, bold cup of Camano Island Coffee.

Posted on 2 Comments

Brew Guide: Turkish Coffee

Brew Guide: Turkish Coffee

Coffee is a huge part of Turkish culture. In fact, traditional houses include special “coffee rooms” specifically for brewing and drinking coffee. In the 17th century, the Turks were spending more time drinking coffee than going to the mosques to pray, so the government made coffee illegal. This, however, didn’t stop the Turks from drinking coffee, and to this day it remains a rich part of their culture.

This brew is difficult, but only takes about 7 minutes.

What You Need

  • Coffee
  • Ibrik
  • Sugar (Optional)
  • Grinder or Turkish Grinder
  • Water

Tools

The ibrik comes in many sizes. A finished cup of turkish is considered 3oz, so the amount of water you use depends on the size of your ibrik and the number of cups you’re serving. You should never fill the ibrik past the neck. Technically, one cup is a tad bit more than 3oz, but we’re using that measurement just to keep things simple.

Grounds

For every 1 cup of water, you should use 1 tablespoon of turkish-ground coffee, which is extremely fine. The best way to get this fine of a grind is to purchase a turkish grinder, but you can also get a similar grind by putting your grinder on the finest setting possible. You’ll find most industrial machines have a turkish setting.

Water/Adding Coffee

Put the water into your ibrik and place it on medium heat. Wait roughly 2 minutes, and then add the grounds into the ibrik. Do not stir the grounds.

Sugar is added by some people who know they prefer it in their brew. If you would like to do this, add sugar on top right after you add the coffee. We recommend a teaspoon to start and you can adjust accordingly next time you brew based on your preferences. Again, do not stir.

Brewing

Once the coffee starts sinking and the sugar begins to dissolve, you can give the coffee a few quick stirs and turn down the heat just a bit. Your coffee will soon begin to bubble a bit on the surface. When you see small bubbles, make sure you turn down the heat even lower. Keep a close eye on your brew – don’t let it boil. A froth will start to rise to the surface. When it does this, remove from heat and let it settle. Once the froth has gone down, put it back on the heat and let it rise once more. Some prefer to let it rise and fall 3-4 times, but we recommend only twice.

Pouring

Take care when pouring your turkish coffee from the ibrik –  Give it a quick initial pour to get the foam, then slow down so most the coffee grounds will stay in the bottom of the vessel and not fall into your cup.

Enjoy

Let it sit for a minute or two, so any grounds that might have slipped into your cup can settle at the bottom. Sit back and enjoy.

Posted on 4 Comments

Brew Guide: Syphon Coffee

Brew Guide: Syphon Coffee

The history of Syphon began with a french woman in the mid 1800s, who designed a beautiful coffee brewer that was intended to be displayed at dinner parties during the brew. Over the years, companies across the globe have designed and sold their own versions of the Syphon. The stovetop and burner versions, both of which are manufactured in Japan, are the most popular versions available today. For this brew, we’ve used the Hario 5 cup Syphon.

Syphon brewing is rather advanced, and takes roughly 12 minutes.

WHAT YOU NEED

  • Coffee
  • Syphon
  • Coffee
  • Filter
  • Gooseneck Kettle
  • Burr Grinder
  • Water

AMOUNTS

  • 3 tbsp coffee & 15oz water (3 cup syphon)
  • 4 tbsp coffee & 22oz water (5 cup syphon)
  • 8 tbsp coffee & 40oz water (8 cup syphon)
  • 24 grams coffee & 443 grams water (3 cup syphon)
  • 32 grams coffee & 650 grams water (5 cup syphon)
  • 64 grams coffee & 1182 grams water (8 cup syphon)

GROUNDS

You’ll need 1 tablespoon of coffee for every 5 ounces of water, ground on a medium grind (a #6 grind on an industrial machine).

FILTER

To start, you’ll want to assemble your filter. We used a cloth filter on our syphon, but other options are available as well – such as glass, paper, or metal/mesh. If you are using a cloth filter, make sure to soak it in boiling water for a few minutes before your first brew. Drop the filter into the top chamber and use the chain to properly hook it on at the bottom.

ASSEMBLY

Fill the “bulb” or lower chamber up with water to the designated fill line and assemble the syphon (don’t forget to put the lid on the top chamber). Slide your Syphon over the heat source. We are using the small wick burner that came with our Syphon, and have filled it with denatured alcohol (a clean burning fuel), which can be purchased from your local hardware store. You’ll need the wick to be tall enough that the flame touches the bottom of the Syphon.

BEGIN BREW

As it heats, the water will start to move up the chain to the second chamber. When all the water has reached the top, pop off the lid and check the temperature. Adjust the heat source accordingly, so your water is approximately 190 degrees.

ADDING GROUNDS

Place the grounds into the chamber and use a bamboo paddle or chopstick to give it a quick, gentle stir. Replace the lid and let the coffee steep.

BREWING

For a smaller syphon (3 cup), wait 45 seconds. For a larger one (5-8 cup), wait just over 1 minute.

FINISHING BREW

Give the coffee another quick stir and then remove the syphon from the heat source. Soon, the coffee will begin to be pulled back down into the bulb. You will know this process is complete when the grounds have formed a small mound in the upper chamber.

ENJOY

You can now remove the top components and use the bottom carafe to serve your coffee. Enjoy.